TUFLOW FV Get Tide draft
Introduction
This page shows how to use Get Tide to download global tide data from the Finite Element Solution (FES) Global Tide model distributed by AVISO. The Get Tide tool extracts astronomical tide boundary conditions from the FES2014 and FES2022 models for use in TUFLOW FV.
Requirements And Downloads
- Install Miniconda and setup a development environment by following the steps within TUFLOW FV Python Environment. If you already have a version TUFLOW FV Python Environment pre February 2026 visit the Get Tools installation and update page before proceeding. If unsure check your version of the TUFLOW FV Python Environment here.
- Install an SFTP client such as WinSCP to access and download files from the AVISO server. This provides a stable and secure download method and supports SFTP connections that cannot be opened directly in Windows File Explorer or Internet Explorer.
- Install 7-Zip or similar to extract compressed files downloaded from AVISO.
- Download the example nodestrings that will be used to define the boundaries for extracting astronomical tide conditions with the Get Tide tool.
Workflow
The workflow to run Get Tide includes the following steps.
- Download Global Tide Data as tidal constituent files.
- Initialise Get Tide to activate the required python environment and navigate to the required working directory.
- Define Boundary Locations so that Get Tide can extract the astronomical tide boundary conditions at the required geographical location/s.
- Run Get Tide to extract astronomical tide boundary condition and format data ready for direct reading by TUFLOW FV.
This page is a guided example running Get Tide via commands to the Command-Line Interface (CLI). An alternative workflow using a Python Application Programming Interface (API) is also available.
Download Global Tide Data
AVISO Account Setup
Use the below steps to download the FES2022 constituent files from Aviso+ website:
- 1. Create an AVISO account and review the license agreement by completing this registration form.
- 2. Once your account has successfully been created login via My AVISO+.
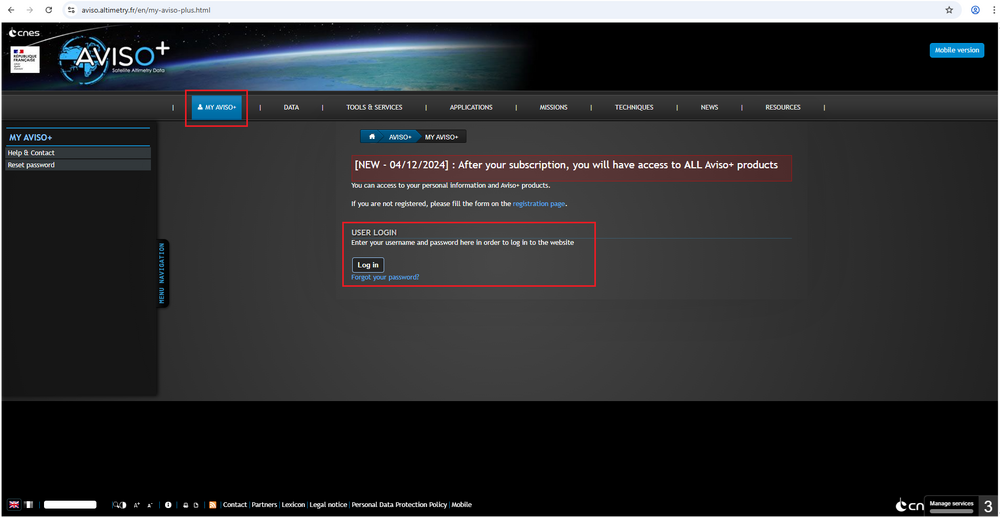
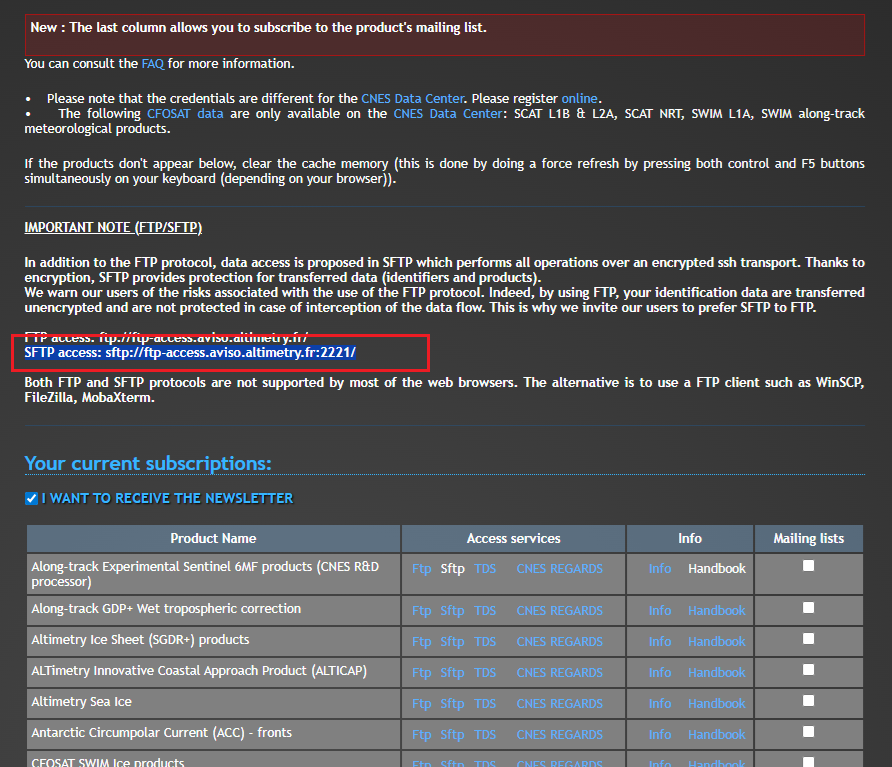
- 3. Once logged in navigate My products on the left hand panel.
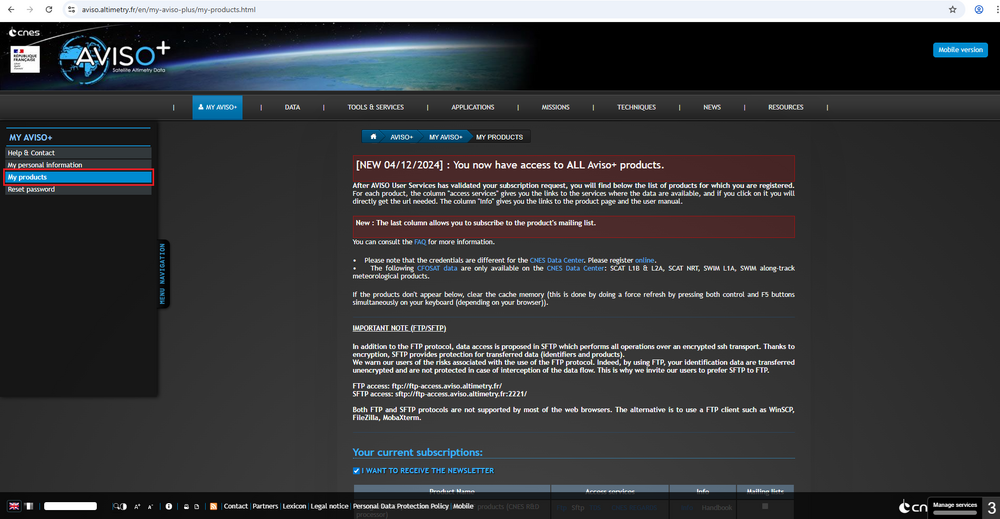
- 4. Scroll down down the page to find the SFTP link (highlight in below figure figure) and copy it.


Downloading FES 2022 Model Data
This section outlines the process for downloading the FES2022b model data via SFTP using WinSCP. The download may take several hours so consider starting it at the end of the day and allowing it to run overnight. The steps below describe how to access the AVISO datasets and download the tide data:
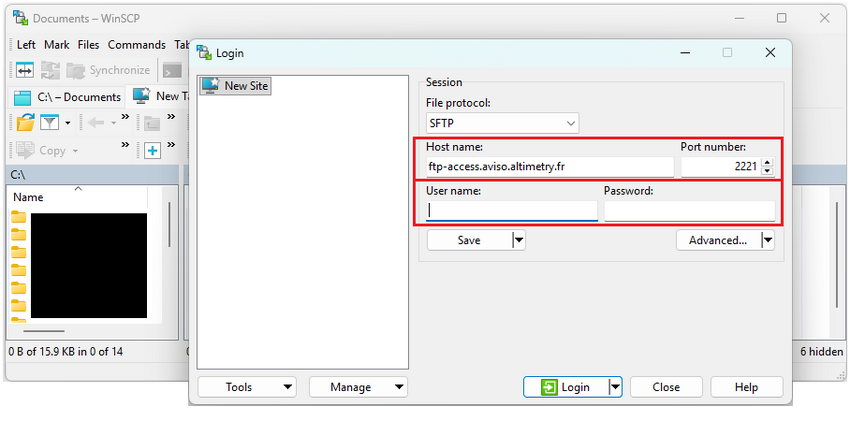
- 1. Open WinSCP.
- 2. Paste the SFTP link into Host name. Note: the SFTP link is obtained on the My Products page shown in the AVISO Account Setup section.
- 3. Enter your AVISO credentials and login.
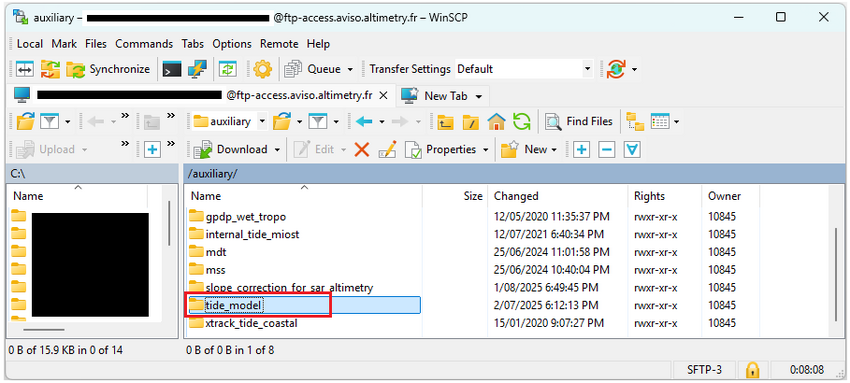
- 4. From the AVSIO products select auxiliary/tide_model.


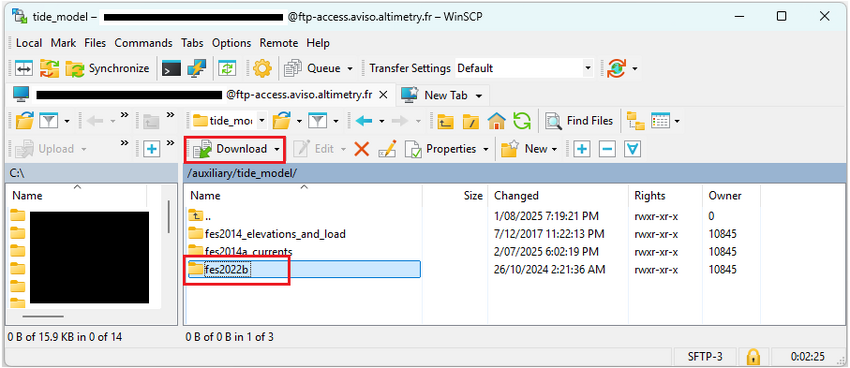
- 5. From /auxiliary/tide_model select fes2022b folder and the Download button.

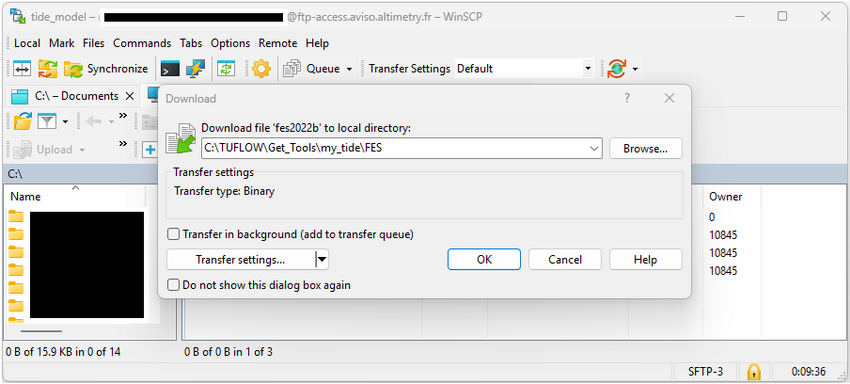
- 6. Navigate to the directory where you would like to save FES model data and then select OK.

Once the download has completed navigate to the fes2022b\ocean_tide_extrapolated folder.

Unzip all files into the same directory using the steps below:
- 1. Open 7-Zip and navigate to fes2022b\ocean_tide_extrapolated.
- 2. Select all 35 folders and click Extract.
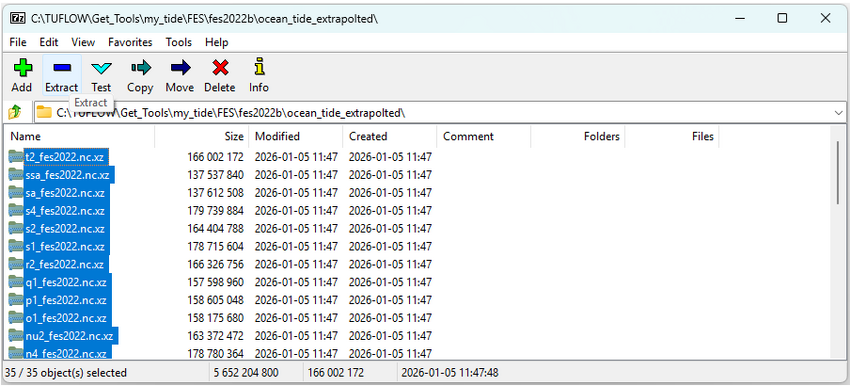
- 3. In the Extract dialog set Extract to to a directory that ends with fes2022b\ocean_tide_extrapolated. This folder structure must be retained to use Get Tide. Refer to the figure below.
- 4. Check Eliminate duplication of root folder. This places all .nc files into the same directory.


There should now be 35 .nc files within the directory C:\TUFLOW\Get_Tools\my_tide\FES\fes2022b\ocean_tide_extrapolated.

Required FES Folder Structure
Get Tide supports multiple FES tide model variants. Each model requires a specific directory structure at the end of the path in order to be read by the program correctly. The files can be stored anywhere on your computer but the last two subfolders must match the Required Directory Structure shown in the table below. In this example, FES2022 and FES2022_extrapolated were downloaded. FES2014 and FES2014_extrapolated tide models must also follow the directory structure specified in the table below.
| FES model | Required Directory Structure | Description |
|---|---|---|
| FES2022 | /fes2022b/ocean_tide_20241025 | FES 2022 ocean tide constituent data. |
| FES2022_extrapolated | /fes2022b/ocean_tide_extrapolated | Extrapolated FES 2022 ocean tide constituent data. |
| FES2014 | /fes2014/ocean_tide | FES 2014 ocean tide constituent data. |
| FES2014_extrapolated | /fes2014/ocean_tide_extrapolated | Extrapolated FES 2014 ocean tide constituent data. |
Note: depending on how the FES data was downloaded or unzipped you may need to create the required folder structure as per above. Be sure to check the folder structure before moving to the next section.
Define Boundary Locations
TUFLOW FV nodestring input layers have been pre prepared to assist with this tutorial. Unzip the GetTide_Nodestrings folder downloaded in the Requirements and Downloads section and place it in your preferred working directory for example C:\TUFLOW\Get_Tools\my_tide.
The nodestrings within 2d_ns_Open_Boundary_001_L.shp are shown below:

Building Nodestrings For Your Own Project
If wanting to replicate this process on your own project you will need to generate TUFLOW FV GIS nodestring files using the procedure shown in Tutorial Module 1. Nodestrings used with Get Tide may be digitised in global longitude–latitude coordinates or in projected coordinate systems (e.g. meters).
TIP: The program will extract tidal boundaries for EVERY line feature in the shapefile. Only supply a shape file with open ocean boundary locations.
Initialise Get Tide
To activate the required python environment and navigate to the required working directory:
- 1. Open Anaconda prompt (installed with Miniconda) and activate the TUFLOW FV Python environment with the command:
conda activate tfv-workspace

- 2. Navigate to your preferred working directory. In this example, the working directory is set to C:\TUFLOW\Get_Tools\my_tide.
cd <directory>

- If the working directory is located on another drive switch to that drive using the drive letter and ':' for example to switch from K drive to C drive enter 'C:' as shown below. Then cd to the required working directory.
<drive>

Reviewing Run Options
Prior to downloading any model output review the arguments for Get Tide by entering the command:
GetTide
For reference the command is labelled as '1' in the red box of the figure below.
The output shows a number of required positional arguments (red box '2') and run options (red box '3'). Positional arguments are required and must be provided in order: out to define the output path and NetCDF name, time_start and time_end to define the date range, nodestring defines the path to input nodestring and the model_dir defines the directory to the tidal constituent files. Optional arguments can be included as needed.

Running Get Tide
This section demonstrates how to run Get Tide and provides examples on using optional command line arguments to customise the boundary condition.
Example 1 - Input And Output Directories
Run Get Tide with the following arguments (labelled as '1' beside the red box below). Before running ensure the output folder exists and that the required nodestrings folder and files have been downloaded. Each argument is described in the table below.
GetTide output/GoC_FES2022_20100301_20100402_UTC.nc 2010-03-01 2010-04-02 GetTide_Nodestrings/2d_ns_Open_Boundary_001_L.shp FES/fes2022b/ocean_tide_extrapolated
| Positional Argument | Value | Details |
|---|---|---|
| out | output/GoC_FES2022_20100301_20100402_UTC.nc | The directory where the netcdf output and TUFLOW FV .fvc boundary condition file will be saved (the directory must pre-exist) and the specified the filename. It is recommended to include the area name, model, start, end and timezone to the output file name. For example, MyArea_FES2014_20220201_20220401_UTC.nc, indicates that the model output in this file is available from the 1st of February 2022 to 1st of April 2022 and is in the UTC timezone. If this convention is adhered to it can save time and reduce errors and confusion when working with differing combinations of boundary conditions for a project model. |
| time_start | 2010-03-01 | The start time for the tide extraction, yyyy-mm-dd. |
| time_end | 2010-04-02 | The end time for the tide extraction, yyyy-mm-dd. |
| nodestring | GetTide_Nodestrings/2d_ns_Open_Boundary_001_L.shp | The path to the nodestring shapefile where tidal water-levels are required for the Gulf of Carpentaria. |
| model_dir | FES/fes2022b/ocean_tide_extrapolated | The path where you saved the pre-downloaded FES 2022 Tidal Constituent files. This folder should contain a set of *.nc files for the extrapolated FES 2022 tidal constituent grids. Note: in this example a relative path from the my_tide directory is used. However, absolute file paths are also accepted. |
As the program is running the information within the red box labelled '2' should appear in the command window. Monitor the progress messages to verify that Get Tide has completed successfully.

Example 2 - Timezone Options
Use the following arguments to add a local time zone to the Get Tide output (labelled as '1' beside the red box below). Before running ensure the output folder exists and that the required nodestrings folder and files have been downloaded. Each argument is described in the table below.
GetTide output/GoC_FES2022_20100301_20100402_AEST.nc 2010-03-01 2010-04-02 GetTide_Nodestrings\2d_ns_Open_Boundary_001_L.shp FES/fes2022b/ocean_tide_extrapolated -tz 10 -ltz AEST
| Positional Argument | Value | Details |
|---|---|---|
| out | output/GoC_FES2022_20100301_20100402_AEST.nc | The directory where the netcdf output and TUFLOW FV .fvc boundary condition file will be saved (the directory must pre-exist) and the specified the filename. Note: the name has been updated to indicate that the file is in the AEST timezone. |
| time_start | 2010-03-01 | The start time for the tide extraction, yyyy-mm-dd. |
| time_end | 2010-04-02 | The end time for the tide extraction, yyyy-mm-dd. |
| nodestring | GetTide_Nodestrings/2d_ns_Open_Boundary_001_L.shp | The path to the nodestring shapefile where tidal water-levels are required for the Gulf of Carpentaria. |
| model_dir | FES/fes2022b/ocean_tide_extrapolated | The path where you saved the pre-downloaded FES 2022 Tidal Constituent files. This folder should contain a set of *.nc files for the extrapolated FES 2022 tidal constituent grids. Note: in this example a relative path from the my_tide directory is used. However, absolute file paths are also accepted. |
| Options | Value | Details |
| -tz | 10 | This helps when working in a local timezone rather than Coordinated Universal Time (UTC). An additional time variable local_time will be added to the output NetCDF adding the tz offset (hrs). Note: the variable time will remain in the NetCDF in UTC. |
| -ltz | AEST | This command should be used in combination with -tz. It adds timezone attribute metadata to the NetCDF local_time variable. |
As the program is running the information within the command window. As highlighted in the red box labelled '2' Local Timezone: 10.0, AEST should be printed in the request list. Monitor the progress messages to verify that Get Tide has completed successfully.

Reviewing Get Tide NetCDF Output
This section is provided for reference only and is not required to be completed as part of this tutorial.
Reviewing NetCDF contents with Python allows the user to access more detailed information on the file contents and attributes than what is available in QGIS. This example shows the contents of the Get Tide NetCDF file using Python and Xarray (which can be installed using the TUFLOW FV Python Toolbox).
The figure below depicts the water level timeseries at a specified location (10 km) along the western boundary (Western_Boundary). We can see water level fluctuations across the time period that are consistent with the influence of tidal constituents.

We can also take a look at the water level along the western boundary at a particular time. The figure below displays a water level long section along the western boundary at 11pm on the 1st of March 2010 (2010-03-01 23:00).

TUFLOW FV Boundary Include File
When Get Tide merges the downloaded data into a single NetCDF file it also creates an fvc file in the same location.
Open the file GoC_FES2022_20100301_20100402_AEST.fvc in a text editor such as Notepad ++.

Within the .fvc file Get Tide has automatically written the FES2022 tidal boundary conditions required by TUFLOW FV and these should be ready to run “as is” subject to user review. Spatially varying tidal water levels are applied using WL_CURT boundaries which are required to capture spatial gradients in tidal amplitude and phase. No atmospheric pressure correction has been applied to the tidal water level data. Users should ensure consistency if MSLP forcing is included elsewhere in the model.
Note: the line: bc == WL_CURT, Eastern_Boundary, ouput/GoC_FES2022_20100301_20100402_AEST.nc and BC == WL_CURT, Western_Boundary, output/GoC_FES2022_20100301_20100402_AEST.nc contains the names within the provided nodestring boundary. This name connects the spatial location of the boundary to the data.
! TUFLOW FV FVC File for FES2022 TIDE Dataset

! Written by TUFLOW FV `tfv-get-tools`

! This control file has been prepared using the TUFLOW FV Get Tools (tfv-get-tools),
! a free set of Python tools designed to assist with the download and formatting of
! boundary condition data from global model sources such as ERA5 and CFSR for use in TUFLOW FV.
! These external model datasets are subject to change over time and are provided 'as is'.
! Users are responsible for reviewing and, where possible, verifying these inputs against
! observational data before use in any modelling application.


! Source: FES2022
! Info: https://www.aviso.altimetry.fr/en/data/products/auxiliary-products/global-tide-fes.html

! NetCDF time datum: AEST
! NetCDF start time: 2010-03-01 10:00
! NetCDF end time: 2010-04-02 10:00

! Nodestrings: Eastern_Boundary, Western_Boundary


BC == WL_CURT, Eastern_Boundary, output/GoC_FES2022_20100301_20100402_AEST.nc
  BC Header == local_time, nsEastern_Boundary_chainage, dummy, nsEastern_Boundary_wl
  BC Update dt == 60.
  BC Time Units == days
  BC Reference Time == 01/01/1990 00:00
  BC Default == NaN
  Includes MSLP == 0
End BC

BC == WL_CURT, Western_Boundary, output/GoC_FES2022_20100301_20100402_AEST.nc
  BC Header == local_time, nsWestern_Boundary_chainage, dummy, nsWestern_Boundary_wl
  BC Update dt == 60.
  BC Time Units == days
  BC Reference Time == 01/01/1990 00:00
  BC Default == NaN
  Includes MSLP == 0
End BC
Including Boundary Conditions
The .fvc file generated by Get Tide can be incorporated into a TUFLOW FV simulation by using an include statement as follows:
! BOUNDARY CONDITIONS
! Tide
Include == ..\bc_dbase\GoC_FES2022_20100301_20100402_AEST.fvc ! Include file for tidal boundary conditions
To check that variables have been correctly read into TUFLOW FV it is recommended to run TUFLOW FV with the hydrodynamic output parameters (as per the example below):
Output == NetCDF ! Output block, NetCDF output format
  Output Parameters == h, v, d ! Water level, velocity, and water depth
  Output Interval == 900. ! Results will be saved every 900 seconds (15mins) of simulation time
End Output
Python API
The Get Tools can be run using a Python API. This enables automation and easy integration into larger workflows and reproducible dataset preparation. Making it ideal for repeatable or scripted simulations. For more information visit the TFV Get Tools git lab repository.
Archive Dataset
If using Get Tide downloaded prior to February 2026 please refer to the Get Tide Archive page.
Updating Get Tools
Periodically updates are made to Get Tools to add new features and fix issues. If using a the tfv get tools package installed after February 2026 refer to the Get Tools update instructions here. If unsure of which version of Get Tools is installed on your machine refer to the Requirement and Downloads section.
Conclusion
This page provides examples of how to run and review Get Tide outputs. To learn how to use our other Python utilities visit our TUFLOW FV Python Toolbox, TUFLOW FV Get Atmos and TUFLOW FV Get Ocean pages. If you have any further queries, feedback or requests for new functionality, feel free to get in contact with support@tuflow.com.