TUFLOW FV Get Ocean Draft
Introduction
This page shows how to use Get Ocean to download global ocean data from HYCOM. The Get Ocean tool can be used to download and merge ocean data ready for use in TUFLOW FV. These boundary conditions include:
- Mean sea level surface anomaly
- 3D ocean currents
- 3D distribution of ocean salinity
- 3D distribution of ocean temperature
All data acquired in this tutorial is supplied by the HYCOM consortium. Refer to the HYCOM data acknowledgement and disclaimer.
Note: Get Ocean can be used to access global ocean data from the Copernicus Marine Service.To use Copernicus data you must first register with Copernicus Marine.
Requirements And Downloads
- Install Miniconda and setup a development environment by following the steps within TUFLOW FV Python Environment. If you already have a version TUFLOW FV Python Environment pre February 2026 visit the Get Tools installation and update page before proceeding. If unsure check your version of the TUFLOW FV Python Environment here.
Workflow
The workflow to run Get Ocean includes the following steps:
- Initialise Get Ocean to activate the required python environment and navigate to the required working directory.
- Run Get Ocean A to download the datasets in their original raw format. This is conducted for a user specified spatial coordinate bounding box and time period. The download can take a long time so it may be best to start this step at the end of the day and allow it to run overnight.
- Run Get Ocean B to merge the data ready for direct reading by TUFLOW FV.
This page is a guided example running first Get Ocean A and then Get Ocean B via commands to the Command-Line Interface (CLI). An alternative workflow using a Python Application Programming Interface (API) is also available.
Initialise Get Ocean
To activate the required python environment and navigate to the required working directory:
- 1. Open Anaconda prompt (installed with Miniconda) and activate the TUFLOW FV Python environment with the command:
conda activate tfv-workspace

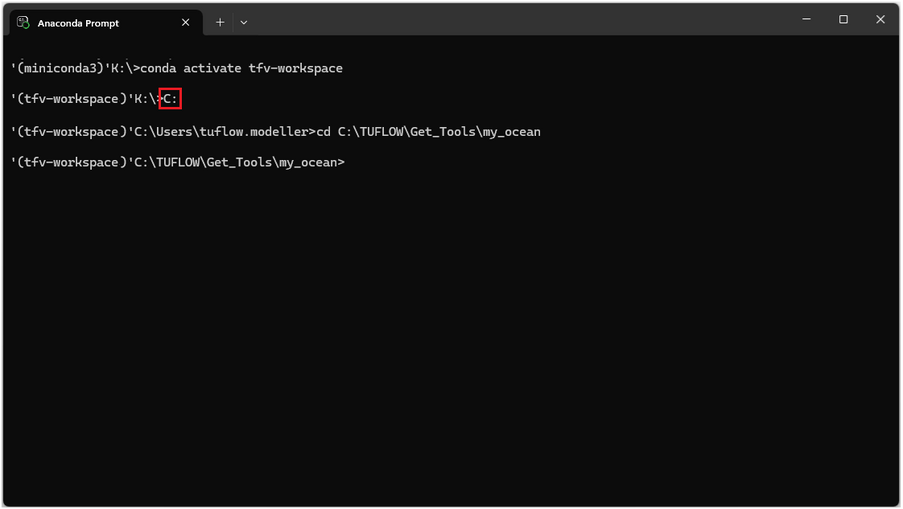
- 2. Navigate to your preferred working directory. In this example, the working directory is set to C:\TUFLOW\Get_Tools\my_ocean.
cd <directory>

If the working directory is located on another drive switch to that drive using the drive letter and ':' for example to switch from K drive to C drive enter 'C:' as shown below. Then cd to the required working directory.
- 3. Check that Get Get Ocean is installed correctly by entering the following command into the command window.

GetOcean
Running Get Ocean outputs an overview of the sub-commands and help commands.
- GetOcean A – Downloads raw ocean physics model datasets and output files for a specified time period and spatial extent.
- GetOcean B – Merges the raw ocean data files into a single NetCDF file and creates a TUFLOW FV FVC (Boundary Include) file.
- GetOcean info – Prints more detailed help information about the program and available run options.

- 4. Run the below command:
GetOcean info
This produces:
- A brief description of the tool’s purpose.
- The available data sources (for example HYCOM).
- Example usage for downloading or merging datasets.
- Guidance on how to access detailed help for specific sub-commands (using GetOcean A -h or GetOcean B -h).

HYCOM Data Consideration - Post 10th August 2024
IMPORTANT
From 10 August 2024, the HYCOM ESPC-D-V02 dataset includes astronomical tidal forcing. Prior to this date the HYCOM GOFS 3.1 model (2014-July to 2024-09-04) did not include astronomical tidal forcing. Therefore model fields between the two models cannot be directly or concatenated in time without further processing. Currently Get Ocean applies the following to complete some simplified de-tiding of the ESPC-D-V02 model output.
- Get Ocean A automatically detects if post-10 August 2024 HYCOM data is requested and downloads the best available native timestep. This is typically one hourly for sea surface height and three hourly for velocity, salinity and temperature fields.
- Get Ocean B applies a centered ~25-hour low-pass filter to all variables.
Note: when downloading HYCOM data from 10 August 2024 onwards ensure at least ±1 day of data must be included beyond the model forcing period.
The centered ~25-hour low-pass filter may not be suitable for all modelling applications, depending on the site and study objectives. To support alternative workflows the unfiltered ssh is retained in the Get Ocean B output NetCDF as surf_el_raw. Users should apply an appropriate tidal filtering method to this variable consistent with project-specific requirements and modelling assumptions.
Get Ocean A
Get Ocean A downloads ocean circulation model output. This section will:
- Review the available run options.
- Provide an example of running the program.
- Demonstrate a method to review Get Ocean A outputs.
Reviewing Run Options
Prior to downloading any model output review the arguments for Get Ocean A by entering the command:
GetOcean A -h
For reference the command is labelled as '1' in the red box of the figure below.
The output shows a number of required positional arguments (red box '2') and run options (red box '3'). Positional arguments are required and must be provided in order: time_start and time_end to define the date range and bbox to define the spatial extent as longitude or latitude bounds. Optional arguments can be included as needed.

Running Get Ocean A
During this step Get Ocean A will download HYCOM data for the Gulf of Carpentaria a region in the north east of Australia.
- The first two arguments are time_start 01/03/2010 and time_end 01/05/2010 (dd/mm/yyyy).
- The -p path switch followed by the output directory specify where raw model output will be saved. The directory name is user defined and in this example set to raw_data. This directory must be manually created prior to running the tool. If the path argument is omitted data is saved to the current working directory.
- The final four arguments are the spatial bounding box 135 143 -19 -7 (xmin xmax ymin ymax) which select the region of data to download. The bounding box must always be the final four arguments.
Enter the commands below ensuing the raw_data folder exists in the current working directory:
GetOcean A 2010-03-01 2010-05-01 -p raw_data 135 143 -19 -7
A confirmation list of the request will be provided. If happy with the request details type Y and hit Enter to confirm the request. To abort type n.
Note: the download may take a long time. Therefore users are encouraged to run Get Ocean A overnight particularly when requesting high temporal resolution data or data covering long time frames. To save time you may have up to 2-concurrent connections to the HYCOM server per IP address so you may run this program twice. For example, if you are collecting data across two years you could use two separate conda windows to concurrently download the first and second year. Be careful that you are not using a shared PC when running this program - you don't want to lock yourself or others out of the HYCOM server.

Once complete review the download summary and confirm that files were downloaded successfully.

The downloaded HYCOM files should appear in your specified output directory as shown below. Note: each file name includes the model name, date (YYYYMMDD) and timestep (in hours). As no timestep was defined in the arguments above the default timestep of 24 hours was used.

Reviewing Get Ocean A Outputs
This section is provided for reference only and is not required to be completed as part of this tutorial.
Prior to merging it is recommended to review the raw downloaded datasets to ensure there are no spatial gaps or corrupted files. It is also good practice to review the attributes of the raw data files as data providers may change variable names, units or conventions without notice. Always confirm that the dataset matches expected units and variable names before use.
Raw files are saved in NetCDF format and can be opened with viewers that support NetCDF4. The example below shows the structure and properties of HYCOM_OCEAN_20100303_24h.nc using Python (which can be installed with the TUFLOW FV Python Toolbox):

Review of the data attributes can be completed to confirm the units for each data variable. The file HYCOM_OCEAN_20100303_24h.nc contains the variables and units below.
| Data Variables | Units | Long Name |
|---|---|---|
| water_u | m/s | Eastward Water Velocity |
| water_v | m/s | Northward Water Velocity |
| water_temp | degC | Water Temperature |
| salinity | psu | Salinity |
| surf_el | m | Water Surface Elevation |
Get Ocean B
Get Ocean B merges downloaded files from Get Ocean A into a single NetCDF file compatible with TUFLOW FV. It also creates a TUFLOW FV boundary condition include file. In this section the following concepts are presented.
- Review the available run options.
- Provide an example of running the program.
- Demonstrate methods to review Get Ocean B outputs.
Reviewing Run Options
Prior to downloading any model output review the arguments for Get Ocean B by entering the command:
GetOcean B -h
For reference the command is labelled as '1' in the red box of the figure below.
The output lists several run options (red box '2') for customising how ocean physics datasets are merged and exported.

Running Get Ocean B
This section demonstrates how to run Get Ocean B and provides examples on using optional command line arguments to customise the merge program.
Example 1 - Input And Output Directories
Run Get Ocean B with the following arguments (labelled as '1' beside the red box below) and ensure the output_data folder exists. Each argument is described in the table below.
GetOcean B -i raw_data -o output_data -f GoC_HYCOM_20100301_20100501_UTC.nc
| Argument | Value | Details |
|---|---|---|
| -i | raw_data | Directory where raw download files have been saved from Get Ocean A. |
| -o | output_data | The directory where merged outputs and TUFLOW FV .fvc boundary condition file will be saved (the directory must pre-exist). |
| -f | GoC_HYCOM_20100301_20100501_UTC.nc | The -f argument is an optional argument used to specify the filename for the merged output. It is recommended to use this feature to include the start, end and timezone to the output file name. For example, MyArea_HYCOM_20220201_20220401_UTC.nc indicates that the model output in this file is available from the 1st of February 2022 to 1st of April 2022 and is in the UTC timezone. If this convention is adhered to it can save time and reduce errors and confusion when working with differing combinations of boundary conditions for a project model. |
As the program is running the information within the red box labelled '2' should appear in the command window. Monitor the progress messages to verify that the merge completed successfully.

Review the contents of the output_data directory. It should contain a single merged NetCDF dataset and TUFLOW FV include .fvc file.

Example 2 - Timezone Options
Run Get Ocean B with the following arguments (labelled as '1' beside the red box below) and ensure the output_data folder exists. Each argument is described in the table below.
GetOcean B -i raw_data -o output_data -tz 10 -ltz AEST -f GoC_HYCOM_20100301_20100501_AEST.nc
| Argument | Value | Details |
|---|---|---|
| -i | raw_data | Directory where raw download files have been saved from Get Ocean A. |
| -o | output_data | The directory where merged outputs and TUFLOW FV .fvc boundary condition file will be saved (the directory must pre-exist). |
| -tz | 10 | This helps when working in a local timezone rather than Coordinated Universal Time (UTC). An additional time variable local_time will be added to the output NetCDF adding the tz offset (hrs). Note: the variable time will remain in the NetCDF in UTC. |
| -ltz | AEST | This command should be used in combination with -tz. It adds timezone attribute metadata to the NetCDF local_time variable. |
| -f | GoC_HYCOM_20100301_20100501_AEST.nc | The -f argument is an optional argument used to specify the filename for the merged output. |
As the program is running check that the timezone commands are as expected (red box '2' below).

If the program has run as expected there should be two new files GoC_HYCOM_20100301_20100501_AEST.nc and GoC_HYCOM_20100301_20100501_AEST.fvc within the output_data directory as shown below.

Reviewing Get Ocean B NetCDF Output
This section is provided for reference only and is not required to be completed as part of this tutorial.
The NetCDF produced by Get Ocean B can be opened with programs or viewers that support NetCDF4. Two examples are presented as follows.
- Using Python and the Xarray library.
- Using the TUFLOW Viewer Plugin for QGIS. While the Get Ocean B NetCDF cannot be opened directly in QGIS the steps outlined in Example 2 can be used to create a GIS compatible NetCDF.
Example 1 - Python
Get Ocean produces a single NetCDF file which contains the merged downloaded data. This example shows the structure and contents of the merged file using Python and Xarray (which can be installed using the TUFLOW FV Python Toolbox):

Python attributes can be used to extract key information such as data units which are summarised in the table below.
| Data Variables | Units |
|---|---|
| water_u | m/s |
| water_v | m/s |
| water_temp | degC |
| salinity | psu |
| surf_el | m |
Example 2 - Viewing a GIS compatible NetCDF
The NetCDF file produced by Get Ocean B contains gridded boundary condition data and cannot be viewed directly in QGIS. To visualise the data in QGIS use the tfv Python Tutorial 3: Working With Gridded Boundary Condition Data to create a GIS compatible NetCDF file.
The NetCDF file created using the tfv Python module can be opened in QGIS using the TUFLOW Viewer Plugin to view the data variables as map outputs. In the figure below the upper plan view shows surface velocity and the bottom image a 3D temperature long section between Point A and Point B. Note: the region of cooler water underlaying the warmer surface water between chainages 1 and 3 degrees of longitude. For guidance on plotting in QGIS using the TUFLOW Viewer Plugin visit: Viewing 3D TUFLOW FV Results in QGIS.

TUFLOW FV Boundary Include File
When Get Ocean B merges the downloaded data into a single NetCDF file it also creates an fvc file in the same location. Open the file GoC_HYCOM_20100301_20100501_AEST.fvc in a text editor such as Notepad ++.

Within this fvc file you will find that Get Ocean has written your open ocean boundary conditions for you. All you need to do is list the open boundary nodestrings (refer BC Nodestrings command in the BC block) and set the relevant surface HYCOM mean sea level elevation offset for your study area and time period as indicated below:
! TUFLOW FV FVC File for Ocean Dataset
! Written by TUFLOW FV tfv-get-tools

! This control file has been prepared using the TUFLOW FV Get Tools (tfv-get-tools),
! a free set of Python tools designed to assist with the download and formatting of
! boundary condition data from global model sources such as ERA5 and CFSR for use in TUFLOW FV.
! These external model datasets are subject to change over time and are provided 'as is'.
! Users are responsible for reviewing and, where possible, verifying these inputs against
! observational data before use in any modelling application.

! Source: HYCOM
! Info: https://www.hycom.org/

! NetCDF time datum: AEST
! NetCDF start time: 2010-03-01 22:00
! NetCDF end time: 2010-05-01 22:00

! Coordinate system EPSG: 4326
! Coordinate system name: WGS 84
! NetCDF x-limits: 135.0400, 142.9600
! NetCDF y-limits: -18.9600, -7.0400

Grid Definition File == output_data/GoC_HYCOM_20100301_20100501_AEST.nc
  Grid Definition Variables == longitude, latitude, depth
  Grid Definition Label == ocean
  Boundary Gridmap == 1
End Grid

BC == OBC_GRID, ocean, output_data/GoC_HYCOM_20100301_20100501_AEST.nc
  BC Nodestrings ==#  ! Please supply open boundary ns list
  Sub-type == 6
  BC Header == local_time,surf_el,water_u,water_v,salinity,water_temp
  BC Update dt == 900.
  BC Time Units == hours
  BC Reference Time == 01/01/1990 00:00
  BC Offset ==-0.0, 0.0, 0.0, 0.0, 0.0 ! Check Offset -0.0
  BC Default == NaN
  Vertical Coordinate Type == depth
End BC
Including Boundary Conditions
The .fvc file generated by Get Ocean B can be incorporated into a TUFLOW FV simulation by using an include statement as follows.
! BOUNDARY CONDITIONS
! Ocean
Include == ..\bc_dbase\GoC_HYCOM_20100301_20100501_AEST.fvc ! Include file for ocean boundary conditions
To check that variables have been correctly read into TUFLOW FV it is recommended to run TUFLOW FV with the ocean physics output parameters (as per the example below).
Output == NetCDF ! Output block, NetCDF output format
  Output Parameters == h, v, d, sal, temp ! Water level, velocity, water depth, salinity and temperature
  Output Interval == 900. ! Results will be saved every 900 seconds (15mins) of simulation time
End Output
Python API
The Get Tools can be run using a Python API. This enables automation and easy integration into larger workflows and reproducible dataset preparation. Making it ideal for repeatable or scripted simulations. For more information visit the TFV Get Tools git lab repository.
Archive Dataset
If using Get Ocean downloaded prior to February 2026 please refer to the Get Ocean Archive page.
Updating Get Tools
Periodically updates are made to Get Tools to add new features and fix issues. If using a the tfv get tools package installed after February 2026 refer to the Get Tools update instructions here. If unsure of which version of Get Tools is installed on your machine refer to the Requirement and Downloads section.
Conclusion
This page provides examples of how to run and review Get Ocean outputs. Boundary condition data is developed from the HYCOM global ocean model for a TUFLOW FV model.
To learn how to use our other Python utilities visit our TUFLOW FV Python Toolbox, TUFLOW FV Get Atmos and TUFLOW FV Get Tide pages. If you have any further queries, feedback or requests for new functionality feel free to get in contact with support@tuflow.com.